Deploying Pydio in AWS with GlusterFS
Created on 2023/03/06,Introduction
Deploying Pydio in a highly-demanding environment (lots of users, tons of documents) to achieve a dropbox-like server at scale requires a solid and elastic architecture.
As a distributed file-system and software-defined storage, GlusterFS is a low-cost way of providing robust storage architecture on standard hardware. On its side, having kept the FileSystem driver at its core since the beginnings of the project, Pydio is a perfect match to be deployed on top of Gluster, to provide user-friendly features and enterprise-grade security.
Architecture
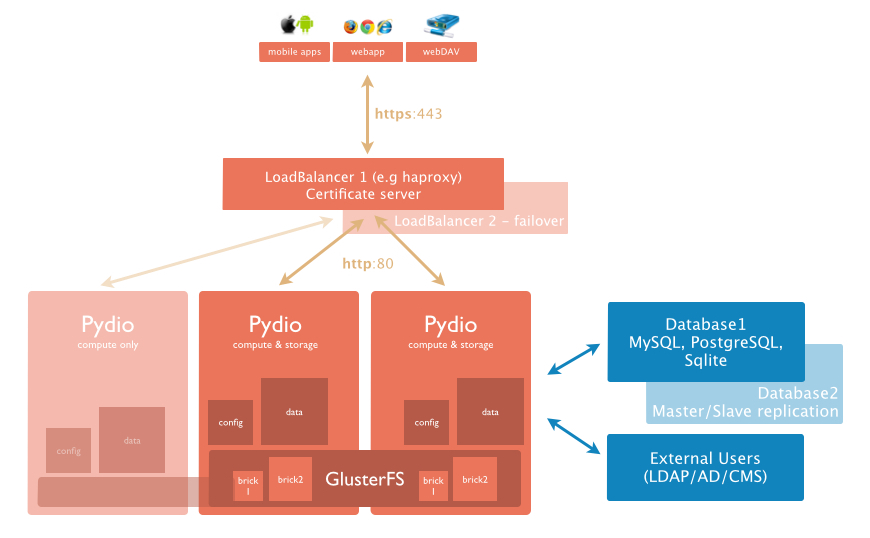
The principle here is to provide High Availability and Scalability combining GlusterFS (for the storage part) and Pydio (for the access part) through a load-balanced cluster of nodes.
We choose here to install Pydio ( = compute ) and the Gluster bricks ( = storage) on the same instances, but every configuration can be imagined : N dedicated nodes for storage, and a subset of them running Pydio, or none of them running Pydio and K nodes of compute, etc.
Also, we choose to set up two Gluster volumes (each of them assembling 2p bricks), for an easier maintenance: one will contain some Pydio shared configurations, allowing the startup of a new Pydio node without hassle, and one will contain the actual users data (files). On EC2, we will use EBS volumes as primary bricks for the data gluster volume, and instances available disk space for the configs gluster bricks. Finally, a DB must be set up to receive all the annex Pydio data (namely users and ACLs, event logs, etc). This DB can be running on another instance, or eventually installed on one of the nodes. It should be replicated and backed-up for a better failover scenario.
The following schema shows an overview of the targeted architecture.
Launch Instances
Create two (or four) EC2 instances, attaching to each an EBS of X Gb depending on the size you require. We chose Ubuntu 12.04 as the OS. Make sure to use a quite open security group, we’ll restrict permissions later. Instances will start with both PRIVATE and PUBLIC ips/dns. Update apt package lists with sudo apt-get update
GlusterFS Setup
Prepare Gluster bricks
We’ll use one for the actual data, and one for Pydio configurations data
$ sudo apt-get install glusterfs-server xfsprogs
$ sudo mkfs.xfs /dev/xvdb $ sudo mkdir /mnt/ebs
$ sudo mount /dev/xvdb /mnt/ebs
And add the line to /etc/fstab to automount at startup
/dev/xvdb /mnt/ebs xfs defaults 0 0
Let’s also create a dedicated folder for the configs volume, on both nodes
$ sudo mkdir /var/confbrick
Create and start the volumes
Recognize nodes each other
On node 1
$ sudo gluster peer probe PRIVATE2
On node 2
$ sudo gluster peer probe PRIVATE1
$ sudo gluster volume create pydio-data replica 2 transport tcp PRIVATE1:/mnt/ebs PRIVATE2:/mnt/ebs
$ sudo gluster volume create pydio-config replica 2 transport tcp PRIVATE1:/var/confbrick PRIVATE2:/var/confbrick
sudo gluster volume start pydio-data
sudo gluster volume start pydio-config
Mount the volumes on both nodes
If not already installed,
$ sudo apt-get install glusterfs-client
Create folders /mnt/pydio-config and /mnt/pydio-data
Edit /etc/fstab again, add in each node the following lines
PRIVATE1:/pydio-data /mnt/pydio-data glusterfs defaults,_netdev 0 0
PRIVATE1:/pydio-config /mnt/pydio-config glusterfs defaults,_netdev 0 0
Then remount everything $ sudo mount -a
Verify everything is mounted : $ df -h
ubuntu@ip-10-62-94-160:/mnt/ebs$ df -h
Filesystem                                                Size  Used Avail Use% Mounted on
/dev/xvda1                                                7.9G  939M  6.6G  13% /
udev                                                      1.9G   12K  1.9G   1% /dev
tmpfs                                                     751M  168K  750M   1% /run
none                                                      5.0M     0  5.0M   0% /run/lock
none                                                      1.9G     0  1.9G   0% /run/shm
/dev/xvdb                                                 10G   33M   10G   1% /mnt/ebs
PRIVATE1:/pydio-data                                      10G   33M   10G   1% /mnt/pydio-data
PRIVATE1:/pydio-config                                    7.9G  939M  6.6G  13% /mnt/pydio-config
Make sure the webserver will be able to use these two folders
$ sudo chown -R www-data: /mnt/pydio-data
$ sudo chown -R www-data: /mnt/pydio-config
Now touch a file on one node and verify it’s on the other side.
Set up DB
For example on Node 1
sudo apt-get install mysql-server
Set up a root password, and allow MySQL to listen to external connexions: comment out following line in /etc/myslq/my.cnf
#bind-address = 127.0.0.1
Using the EC2 PUBLIC address in the Pydio Config
Create a database
mysql> create database pydio;
mysql> grant all privileges on pydio.* to 'pydio'@'%' with grant option;
(Make sure to add a password, or update password at the end, otherwise it creates users with empt password)
Deploy pydio
First Node
Get the script from https://raw.github.com/pydio/pydio-core/master/dist/scripts/glusterfs/py... and run it as root.
$ wget https://raw.github.com/pydio/pydio-core/master/dist/scripts/glusterfs/pydio-gluster.sh
$ chmod u+x pydio-gluster.sh
$ ./pydio-gluster.sh
Once finished, start or restart apache
$ apachectl start
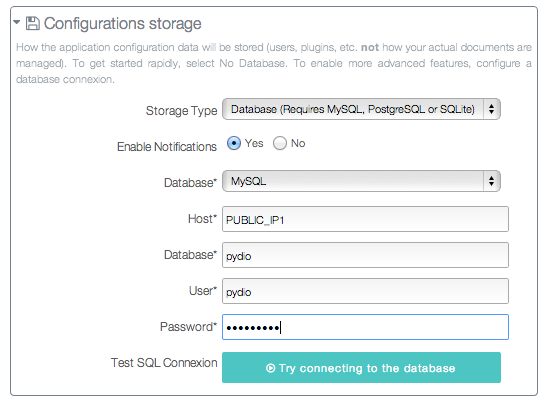
Go to the public IP of the node through a web-browser http://PUBLIC_IP1/pydio/, and follow the standard installation process. Setup admin login and global options, and for the Configurations Storage, choose Database > Mysql , and use the public IP of the DB node as server host.
Then save an connect as admin, switch to the “Settings” workspace, and do some customization as you like in the configuration. You can activate some additional plugins, customize logo and application title, etc. The interesting part of doing that now is that any changes will be automatically reported to the other nodes you switch on.
Second Node
As they will share their base configuration through the gluster pydio-config volume, the next nodes will directly inherit from the first node configs. So to add fire a new node, all you will have to do will be the script part:
$ wget https://raw.github.com/pydio/pydio-core/master/dist/scripts/glusterfs/pydio-gluster.sh
$ chmod u+x pydio-gluster.sh
$ ./pydio-gluster.sh
Then verify that pydio is up and running, and that you can log in with the same credentials, at http://PUBLIC_IP2/pydio/
Load Balancer
AWS LoadBalancer
We could use a custome compute node equiped with HAProxy or some similar software, but as our tutorial is running on AWS, we will use the available service to that: LoadBalancer. In your AWS console, create a LoadBalancer, forwarding port 80 to instances port 80.

To configure how healthcheck will be performed (how does the LB check that instances are alive), make sure to change the name of the file checked to check.txt. It is important because thanks to our install scripts, the nodes Apache servers are configured to skip the log of calls to this file, to avoid filling the logs with useless data (happening every 5s).
NOTE If you have an SSL certificate, which is definitely a good security rule, you will install it on this LoadBalancer, and redirect port 443 to 80: internal communications do not need to be encrypted.
Session Stickyness
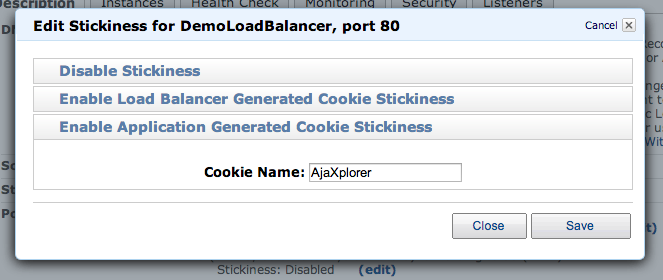
Once edited and created, edit the “Stickyness” parameter of the redirection rules and choose “Enable Application Generated Cookie Stickyness”, using “Pydio” as cookie name. This is important, as although clients will be randonly redirected to instances on first connexion, once a session is established, it will always stay on a given instance.
NOTE Session stickyness avoid us to set up a session-sharing mechanism between nodes, but this could be done for example adding a memcache server.
Outside world address
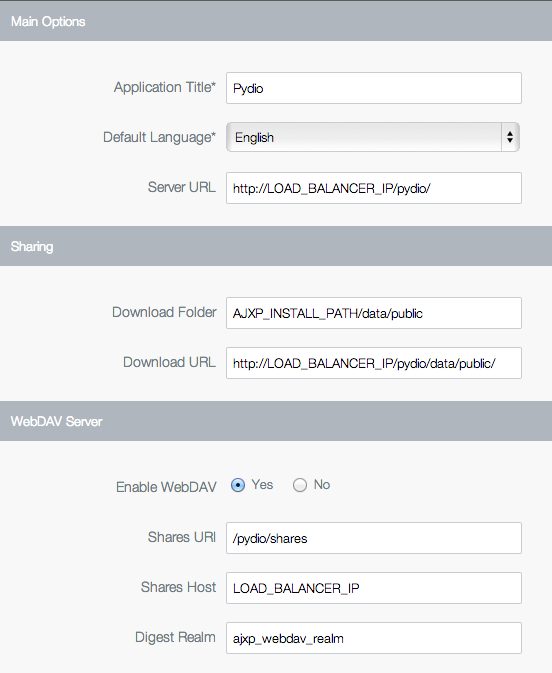
Now that our various nodes will be accessed through a proxy and not through their “natural” public IP, we need to inform Pydio of that. This is necessary to generate correct sharing URLs, or sending emails pointing to the correct URL. Without that, Pydio would try to auto-detect the IP, and would probably end up displaying the PRIVATE IP of the current working node.
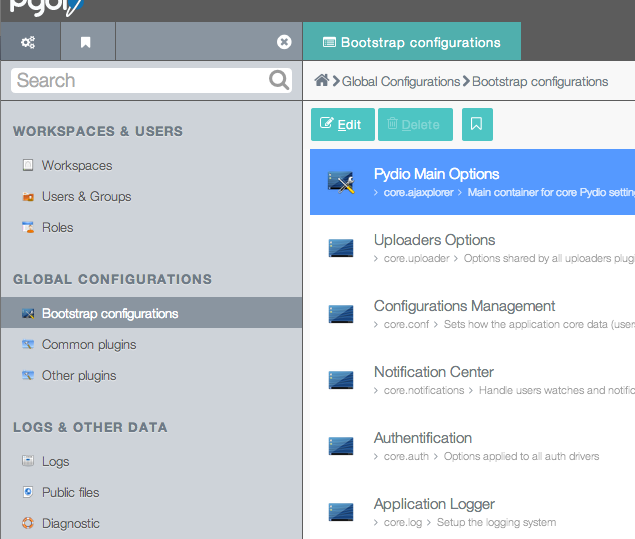
Login as admin to Pydio, and go the Settings > Global Configurations > Pydio Main Options. Here, update the fields Server URL and Download URL with the real addresses, and save. Go to a file workspace and try to share a file or a folder, and verify the link is correct and working.
Conclusion: adding new nodes on-demand
Well, that’s pretty much. We could refine this architecture on many points, but basically you’re good to go.
So what do you do to add a new node? Basically you’ll have to
[if you need more storage]
- Fire up a new instance with the ubuntu OS
- Configure Gluster to add it as a new brick to the volume
[if you need more compute]
- Fire up a new instance with the ubuntu OS
- Configure the gluster client to mount the volumes,
- Run the Pydio script to deploy and load configs
- Add this node to the LoadBalancer instances list.
Wishing you a happy scaling!