Red Hat Storage Deployment
Created on 2023/03/06,Introduction
Red Hat Storage Server
Smarter enterprise storage
Deploying scalable, flexible enterprise storage shouldn’t lock you in to high-cost proprietary solutions. Red Hat® Storage Server helps your enterprise manage the explosion of big, semi-structured, and unstructured data growth while maintaining the storage performance, capacity, and availability you need to meet your most demanding enterprise storage requirements.
Lower costs
Red Hat’s open software solution for scale-out network-attached storage (NAS) lets you manage exponential data growth at a fraction of the cost of other storage solutions.
Easily access information
Whether deployed on-premise, or in a private, public, or hybrid cloud environment, Red Hat Storage makes it easier to access information, brings freedom of choice, and brings the power of community-driven innovation to your enterprise.
Storage problems—solved
Red Hat Storage Server solves enterprise storage requirements, including:
- Enterprise-wide file sharing with a single access point across data storage locations.
- Nearline storage for infrequently accessed data that needs to be online.
- Rich media (audio and video) content distribution with petabyte-scale storage and high-read performance requirements.
- High-performance storage for bandwidth-intensive applications like weather prediction and oil and gas exploration.
- Centralized Storage-as-a-Service to enterprise applications.
- Backup target and archive for on-site or off-site data protection.
Pydio and Red Hat Storage
Solution overview
Pydio is an open-source alternative to Dropbox and Box.net, providing accesss to any filesystem through a neat webapp, dedicated iOS and Android native applications, as well as WebDAV. This document will describe how to deploy it efficiently in an Red Hat Storage environment, assuming you have the following set up :
- One RHServer node for LoadBalancer proxy (using HAProxy software).
- N RHServer node accessing the distributed replicated gluster volume.
- Optionaly, and AD or LDAP directory to provide users (Pydio has its own user system otherwise).
The idea of this setup is to actually use the gluster nodes to act as HTTP servers, in an High Availability fashion : clients will access through the proxy to either node (based on a round-robin balance), and if one node dies it will be automatically ignored. Adding a node should be a matter of minutes, mounting the gluster volume, running the Pydio install script, and telling the proxy of this new node.
NOTE : During the Pydio installation scripts, except it is already checked, you will be asked to enable the “RHServer EUS Optional Server” channel subscription, by providing your RHN login and password. Please make sure you have them available before running the script.
Architecture Diagram

Pre-requisite : create the two gluster volumes
This installation will rely on two different gluster volumes
- /mnt/samba/ajxp-data/ Will contain all the actual data of the users. Metadata will be stored in the file system extended attributes.
- /mnt/samba/ajxp-config/ Will contain all ajaxplorer specific configurations and internal data.
Ajaxplorer Setup
Download the deployment scripts
Download the following scripts on your gluster nodes :
wget https://raw.github.com/ajaxplorer/ajaxplorer-core/master/dist/scripts/rhs/rhs-ajaxplorer.sh
chmod 755 rhs-ajaxplorer.sh
Running Pydio script on a first gluster node
The provided rhs-ajaxplorer.sh script will deploy Pydio and all necessary dependancies automatically on a gluster node.
./rhs-ajaxplorer.sh
It will detect if this is the very first node to be installed, and in that case will ask you to run the Pydio graphical installation, by accessing this first node through a web-browser, at url http://first_node_IP/ajaxplorer/
Pydio configuration
Standard set-up
When deploying this very first Pydio node, you will have to go through the standard Pydio installation wizard to setup the basic configs.
- Choose an administrator user name and password
- Skip Emails configuration for the moment
- Setup the “Configurations Storage” : this defines how Pydio handles its own internal configurations. As a start, we suggest using an Sqlite3-based backend, although a MySQL DB would be recommanded for scalability purpose. The SQlite file will be stored on the gluster config volume, and will be shared amongs all Pydio nodes.
Execute installation and login, you’re in! If you go to the Settings panel (in the admin user menu), you will here be able to switch the Authentication mechanism to LDAP or AD if necessary. Please refer to the admin guide before touching this, you could end up being logged out of the system!
Solution specific configurations
Some Pydio features will generate http links used by the users, and generally, Pydio can safely detect the link “base” using the current server IP. In the architecture presented in this document, the software may end up building links using the Pydio instance server IP, i.e. the internal LAN IP, not the public IP. For this reason, you must update a couple of Pydio parameter using the HAProxy node public IP, the one that will be the unique entry point to the system by the clients.
Let’s say the public IP of haproxy is HA_IP, here are some options to set inside Pydio Main Options
- Main Options > Server URL : http://HA_IP/ajaxplorer
- Sharing > Download URL : http://HA_IP/ajaxplorer_public (there is a virtual host)
- WebDAV Server > Shares Host : http://HA_IP
- WebDAV Server > Shares URI : /ajaxplorer/shares/
As your editing this parameters, make sure the following are checked as well:
- WebDAV Server > Enable WebDAV : Yes
- Command line > Command-line Active : Yes
Next nodes deployment
Once you’re setup with your configuration on the first Pydio instance, you will be able to run the script on the other nodes, and configurations will be automatically imported from the “master”. At the end of the installation, you should be notified that Pydio configurations were correctly detected on the gluster volume, and check that everything is indded running as expected by accessing the new node web server : http://new_node_IP/ajaxplorer/
Installing the Load Balancer
On the Proxy node, simply download and execute the rhs-haproxy.sh script:
wget https://raw.github.com/ajaxplorer/ajaxplorer-core/master/dist/scripts/rhs/rhs-haproxy.sh
chmod 755 rhs-haproxy.sh
./rhs-haproxy.sh
Open the /etc/haproxy/haproxy.cfg At the very end of the file, you will see the backend definition : to what IP am I listening (this will be your outside world IP), and what are the available nodes. Please modify this accordingly. Also, make sure to change the root:haproxy credential to access the haproxy statistics through the browser.
listen http_proxy 192.168.1.21:80 mode http # This will enable the statistic interfaces # Accessible at proxy_url/haproxy?stats stats enable # # Modify here the statistics user credential to use a secret key! # stats auth root:haproxy # Round-Robin & Session Stick on Pydio balance roundrobin # Load Balancing algorithm appsession AjaXplorer len 64 timeout 3h request-learn option forwardfor # This sets X-Forwarded-For # Check the health of each server option httpchk HEAD /ajaxplorer/check.txt HTTP/1.0
  #
  # And modify here your nodes IPs
  #
  server ajxpnode1 192.168.1.10:80 weight 1 maxconn 512 check
  server ajxpnode2 192.168.1.11:80 weight 1 maxconn 512 check
  server ajxpnode3 192.168.1.12:80 weight 1 maxconn 512 check
  server ajxpnode4 192.168.1.13:80 weight 1 maxconn 512 check
  # ADD OTHER NODES HERE
Once you are done, restart HAProxy using
/etc/init.d/haproxy restart
Using Pydio: apps, REST, CLI
Standard Access
At this step of the tutorial, you should be able to access the external IP http://external_IP/ajaxplorer/ and this will round robin the load on the various nodes.
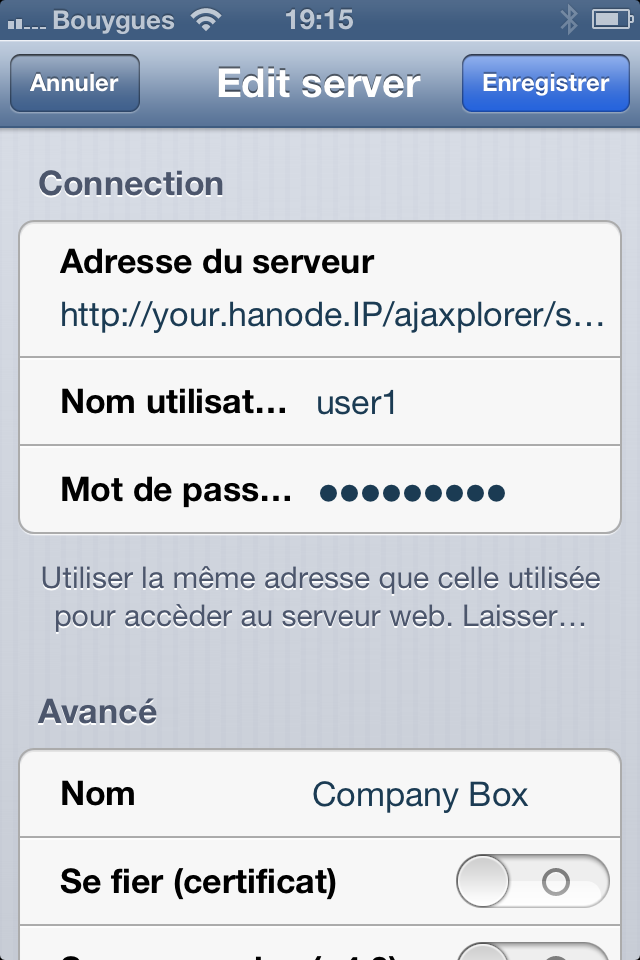
This URL is the unique entry point, used by all standard Pydio “clients” : this webapp, but also the iOS and Android applications. In these apps, at first connexion, you are prompted for some connexion information. Fill them using http://HA_IP/ajaxplorer/ as the server URL, and your login / password as credentials.
Note that you will also be able to access the HAProxy statistics by opening the following URL : http://external_IP/haproxy?stats and providing the credentials you have modified in the configuration file.
WebDAV: drive mounting, REST-access
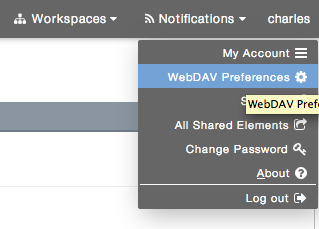
WebDAV is by default activated only on a per user basis. In the previous sections, you were instructed to make it available application-wide, in the Settings Panel. Now as a standard user (or admin), you should be able to see in the user top-right menu a “WebDAV Preferences” item. Use it to activate this feature for the given user.
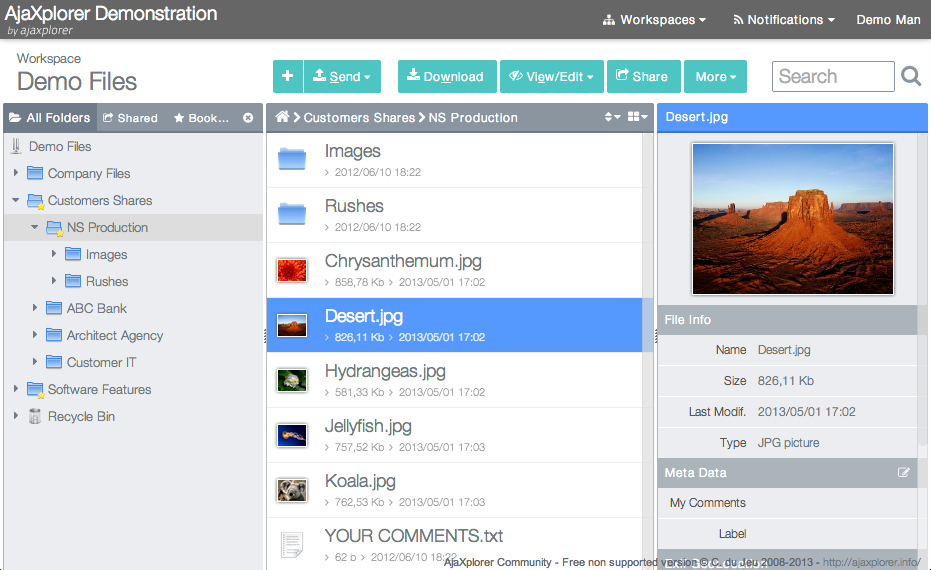
It will display an URL that is differing from the Webapp access point. This is a dedicated URL you will use to mount your authorized workspaces as a “Network Drive” inside your OS explore (Windows Explorer, Mac OS Finder, Linux DavFS client). This can be quite handy, although not so performant for some of these clients implementations (typically Mac Finder is known to be a poor implementation). You can find below a sample screenshot of the Windows 7 “Map Network Drive” feature.

One interesting thing of giving WebDAV access out of the box is that you can now use this API as a RESTful access point to GET / PUT a file inside / from a workspace. Using cURL, here are some sample command lines :
GET the file contract.pdf from Workspace “My Files”, as user USER, located inside folder /Folder1/subFolder2″
curl --user USER:PASSWORD --remote-name http://HA_IP/ajaxplorer/shares/my-files/Folder1/subFolder2/contract.pdf
PUT the file contract2.pdf at the same location, given the file is located in the directory from which you execute the cURL command
curl --user USER:PASSWORD --upload-file contract2.pdf http://HA_IP/ajaxplorer/shares/my-files/Folder1/subFolder2/contract2.pdf
Accessing the framework via PHP CLI
It’s possible to launch the whole framework and execute any actions via the command line. Typically, System Administrators will use the admin API to automatize provisionning directly, without going through HTTP : create users, roles, assign access rights, etc.
It is also used internally to make tasks triggered from the GUI “asynchronous” : they are started on the server and do not need to keep a window open. For example, Lucene Indexation is started that way. One can also launch some administrative tasks from outside the web, e.g. via a CRON job..
If you want to use the command line, placed at the root of the installation, you will first have to find the correct action to trigger, by browsing the “Developer Resources” > “Actions API” available directly inside the Settings panel.
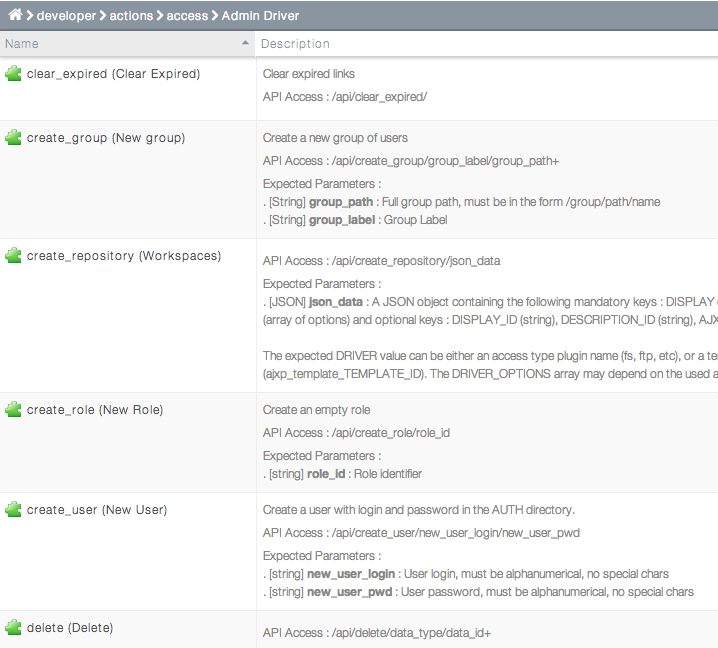
Then , if you want for example to trigger the action “create_group” with parameters id “sales” and label “Commercial”, you’ll have to call the following command:
php cmd.php -u=user -p=password -a=create_group -r=repository_id --group_path=/sales --groupLabel=Commercial
Note the difference between simple-dash parameters and double-dash parameters : the first ones are always necessary, whereas the latter ones will depend on the triggered action.
Going further with HA
This setup should easily demonstrate the horizontal scalability of such an RHS+Pydio configuration. However, if you intend to deploy in a highly demanding production environnment, you should consider the following suggestions.
Doubling the HAProxy Node
This is a fairly simple setup for demonstrating LoadBalancing and node failing automatic detection. To provide the best High Availability configuration, you should actually double the LoadBalancer nodes, using HAProxy and Heartbeat to make sure that if one of them fall down, a slave can take the relay.
Setting up a mutual DB
Although the key to the data high availabilty relies on the data being stored on the filesystem, some side-features of Pydio are now requiring a database setup. In this tutorial, we covered the case using a Sqlite3 database shared through the Gluster volume, which would not scale well. You should instead consider dedicating a MySQL database to replace this, eventually using solutions like Percona DB to manage the DB replication and HA.
Share the PHP Sessions
The Proxy setup is set so that once a client is connected to a given Pydio node, the session is “sticky” and HAProxy will always redirect this client to this node. If the node falls down, the client will have to start a new session. Avoiding this can be done by sharing the session amongst all Pydio node, using for example a dedicated Memcache server accessed by all nodes.