[ED] CentOS/RHEL 7 Systems
Create an account to grab your API Credentials
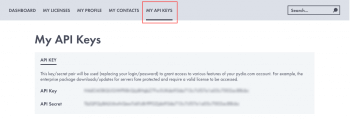
Our Enterprise Repositories are password-protected via API Key and API Secret. You can find them in your Pydio.com Account, under the "My API Keys" menu:
Warning: - This how-to is applied for Centos 7 and RHEL 7 x86_64 only. - This repo uses software collection, please make sure that your box is running to provide only Pydio service. It may break other services due to php version.
Pydio 7 and its dependencies require PHP version >= 5.6. However, centos 7/rhel 7 are still support PHP 5.4 as official version. That's why we have to use extra repos to pack with Pydio 7. For more information about software collection, please visit: rh-php56
Install Software Collection, EPEL and Pydio repositories
EPEL
yum install epel-release scl-utils
CentOS 7
yum install centos-release-scl
or RHEL 7
yum-config-manager --enable rhel-server-rhscl-7-rpms
Remi's RPM
rpm -Uvh https://www.softwarecollections.org/en/scls/remi/php56more/epel-7-x86_64/download/remi-php56more-epel-7-x86_64.noarch.rpm
Pydio
rpm -Uvh https://download.pydio.com/pub/linux/centos/7/pydio-release-1-1.el7.centos.noarch.rpm
Installation
At this point, your box contains all dependencies necessary to install Pydio. Hit the following commands to update.
yum clean all
yum update
Installing Pydio Core (first time)
Pydio can be installed by: yum install pydio-core
pydio-core: contains essential packages with basic functionalities.
you can additionally install some plugins by using command: yum install pydio-plugin-pluginName
Or yum install pydio-all to install all community packages of Pydio.
Installing Pydio Enterprise
Enterprise version requires extra repo which is reserved only for subscribed clients.
Add enterprise repo:
rpm -Uvh https://API_KEY:API_SECRET@download.pydio.com/auth/linux/centos/7/x86_64/pydio-enterprise-release-1-1.el7.centos.noarch.rpm
Note: If your system runs on SSL port, httpd24-mod_ssl module is required.
Then edit /etc/yum.repos.d/pydio-enterprise.repo and replace API_KEY, API_SECRET by your credential. You can get API_KEY, API_SECRET in https://pydio.com > login with your account > User account >> MY LICENSES
[pydio-enterprise]
name=Pydio official packages for enterprise version
baseurl=https://API_KEY:API_SECRET@download.pydio.com/auth/linux/centos/7/x86_64
enabled=1
gpgcheck=1
protect=1
gpgkey=file:///etc/pki/rpm-gpg/RPM-GPG-KEY-PYDIO
Your box is ready for this command: yum install pydio-enterprise to install all enterprise packages
Upgrading from Pydio 6.4.2
Warning: If you've installed Pydio before, please backup your sytem or take a snapshoot before upgrade.
Update the whole system
yum update -y
Upgrade pydio only
yum update pydio-core pydio-enterprise
Post install/upgrade.
This step is required to reconfigure Pydio, apache and php. Because the system now contains multiple version of apache and php, we should do:
- Disable default apache and php5.4
- Enable new apache and php5.6
- Migrate configuration of php5.4, old apache to new version
Disable default apache:
systemctl disable httpd
systemctl stop httpd
Enable new apache:
systemctl enable httpd24-httpd
systemctl start httpd24-httpd
Enable php56
source /opt/rh/rh-php56/enable
Enable httpd24-http
source /opt/rh/httpd24/enable
Now you can verify the PHP version by typing the command in terminal windows:
[root@localhost ~]# php -v
PHP 5.6.5 (cli) (built: Aug 30 2016 13:52:26)
Copyright (c) 1997-2014 The PHP Group
Zend Engine v2.6.0, Copyright (c) 1998-2014 Zend Technologies
    with the ionCube PHP Loader (enabled) + Intrusion Protection from ioncube24.com (unconfigured) v6.0.5, Copyright (c) 2002-2016, by ionCube Ltd.
    with Zend OPcache v7.0.4-dev, Copyright (c) 1999-2014, by Zend Technologies
Software Collection use different location than default to deploy software base on its version. And new location for PHP56 is:
Equivalent paths between default and software collection version
| file | default version | Softwarecollection version |
|---|---|---|
| php.ini | /etc/php.ini | /etc/opt/rh/rh-php56/php.ini |
| php cli | /usr/bin/php | /opt/rh/rh-php56/root/usr/bin/php |
| php module configs | /usr/lib64/php/modules | /opt/rh/rh-php56/root/usr/lib64/php/modules |
| apache module configs | /etc/httpd/conf.modules.d/ | /opt/rh/httpd24/root/etc/httpd/conf.modules.d/ |
| pydio.conf | /etc/httpd/conf.d/pydio.conf | /opt/rh/httpd24/root/etc/httpd/conf.d/pydio.conf |
If you upgrade from Pydio 6.4.2, and php.ini was changed, you should change such parameters in new php.ini as well: /etc/opt/rh/rh-php56/php.ini
Update database
All sql script is store in /usr/share/doc/pydio/sql, you can execute following commands to upgrade your exited DB. The script for updating DB can be downloaded:
For example:
mysql -u username -p databasename < path/7.0.0.mysql
Change the version number:
mysql> UPDATE ajxp_version SET `db_build`="66";
Others configurations
PHP.ini parameters
Following parameters should be reconfigured in /etc/opt/rh/rh-php56/php.ini (not /etc/php.ini)
Example:
max_execution_time = 300
post_max_size = 200M
upload_max_filesize = 200M
output_buffering = Off
Then restart apache
systemctl restart httpd24-httpd
MariaDB
In this how-to, we take an example of using MySQL to store all configuration of Pydio.
Install mariadb:
yum install mariadb mariadb-server
Start mariadb service at boot time
systemctl enable mariadb
systemctl start mariadb
Run secure installation
mysql_secure_installation
Enter mysql command line
mysql -u root -p
Execute following commands to create database for pydio
create database pydio;
create user 'pydio'@'localhost' identified by 'password';
grant all privileges on pydio.* to 'pydio'@'localhost';
flush privileges;
