Optimizing Pydio Performances
Created on 2023/03/06,OPTIMIZE PYDIO
Here we will give you all the tips that you need to have an optimized running Pydio.
Most of the commands that i give are based on a Linux Distribution so unless you're using a different Distribution it should be more or less the same ( if it doesn't give you what was expected you should look at your OS's documentation )
1. FIRST STEP YOUR SERVER
You have to pick a good server with a good hardware. The best webservers on the market right now are Apache and Nginx. Apache is one of the most used server and is always the default choice. Nginx can be the better choice if you have the knowledge about its Nginx+PHP FPM setup.
If you're not comfortable with Nginx stick to Apache
2. CONFIGURATION
Output_buffering : The diagnostic tool will warn you about it and so i will show you how to set this one up. First you have to know where your php.ini file is located, you can use this command on Linux distrubitons to find it
php --ini | grep "Loaded Configuration File:"and look for the lineOutput_buffering =and set it toOutput_buffering = offOP Cache : It should be standard as it's bundled by default with php 5.4 and above. You can check it using
php -vand it will show you the following :
PHP 7.0.22-0ubuntu0.16.04.1 (cli) ( NTS )
Copyright (c) 1997-2017 The PHP Group
Zend Engine v3.0.0, Copyright (c) 1998-2017 Zend Technologies
    with Zend OPcache v7.0.22-0ubuntu0.16.04.1, Copyright (c) 1999-2017, by Zend Technologies
If you have this line it means that its working : with Zend OPcache v7.0.22-0ubuntu0.16.04.1, Copyright (c) 1999-2017, by Zend Technologies
You can also check it using php -i | grep "opcache.enable
and look at this line : "opcache.enable => On => On"
Otherwise you can look in the php.ini file and get a look at the following line opcache.enable =
and set it to opcache.enable = 1
For caching you can also use Xcache or APC. As long as you know how to set them up otherwise stick to OPcache.
- In-Memory caching : With Pydio you have an new tool which allows you to support other Key-Values Stores such as Memcache, Memcached, Redis, etc...
To use it first make sure you have the plugin enabled, by going to All Plugins > Available Plugins > Cache Server and make sure that you have Doctrine Cache Driver enabled.
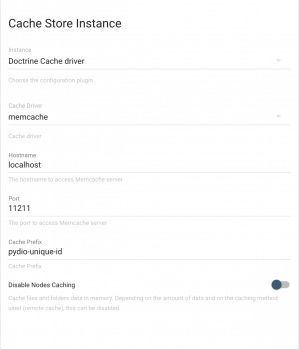
Then go to Application Parameters > Cache Server Cache store instance and set it as you want. I will give you an example :
- Instance : If you want to use cache you have to put Doctrine cache driver ( the plugin allowing to use caching ).
- Cache Driver : What caching are you going to use.
For example : memcache
to show you how it works i will be using memcache but you can use the one that you want
- Hostname : ( for the memcache case ) the server where your memcache is located.
- Port : ( for the memcache case ) the server's port for memcache.
- Cache Prefix : how you want the cache to be organized.
3. MISC
You can use command-line PHP to send long running operations to the server such as for example : compression/decompression operations, indexation, etc ... Note that you can still navigate even though you launched an operation.
If you are using the ENTERPRISE DISTRIBUTION make sure that you have IONCUBE Loader enabled check the following link HERE for more details.
