Install Pydio Booster Manually
Installing Binary
You can download our booster from DOWNLOAD PYDIO BOOSTER choosing the correct version for your architecture.
Network Configuration
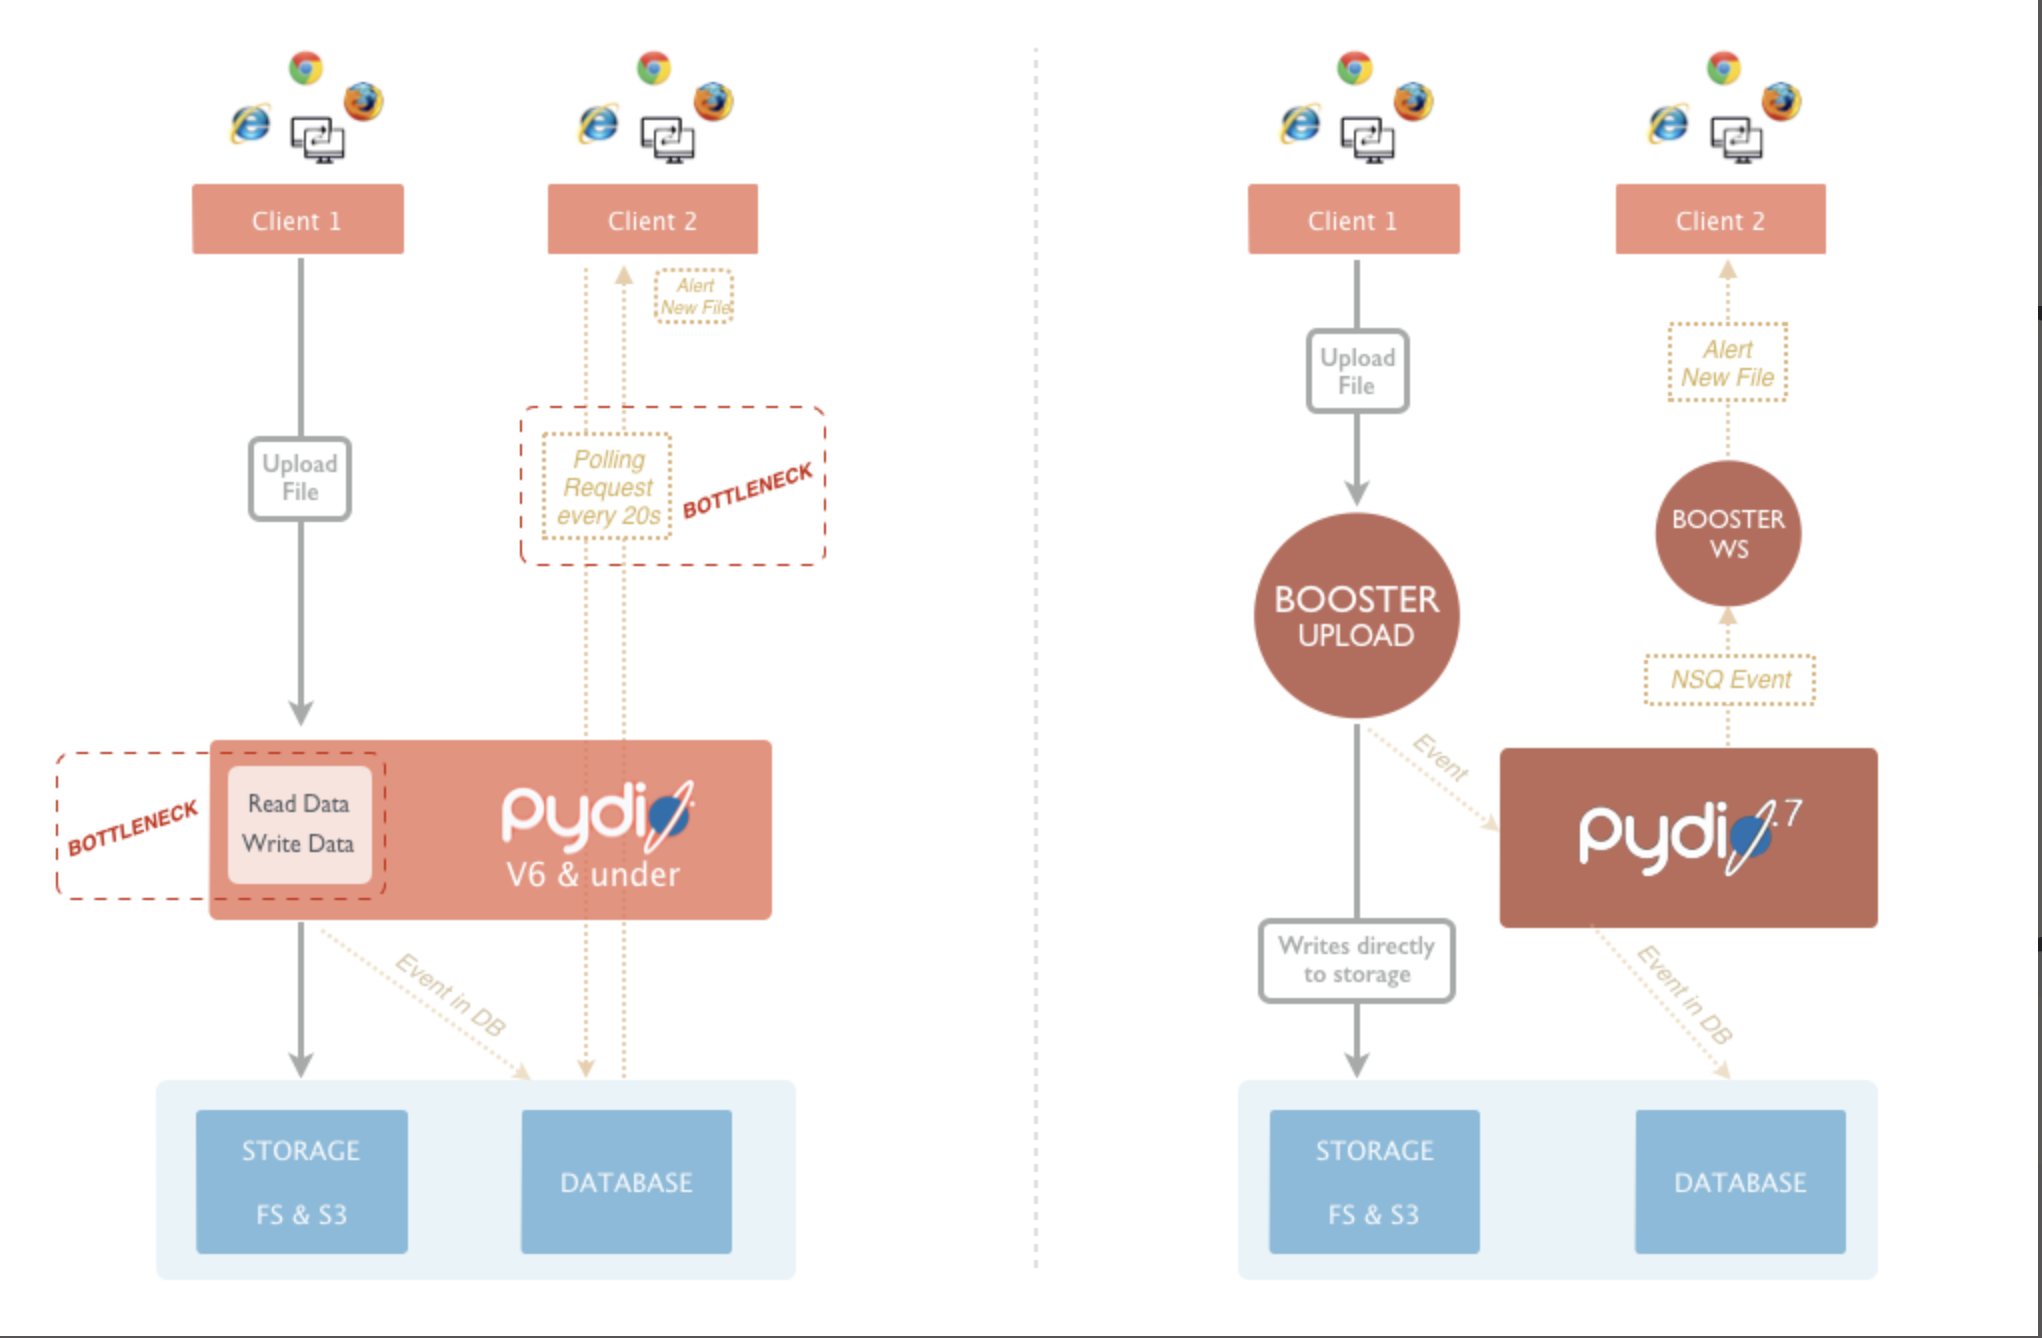
The diagram below shows how Pydio Booster will communicate with your server.
Configure and start
Before being able to configure Pydio Booster you will need to generate a TOKENP and TOKENS pair.
Initial Pydio setup
Go to Message Queuing plugin configuration Application Parameters > Pydio Booster:

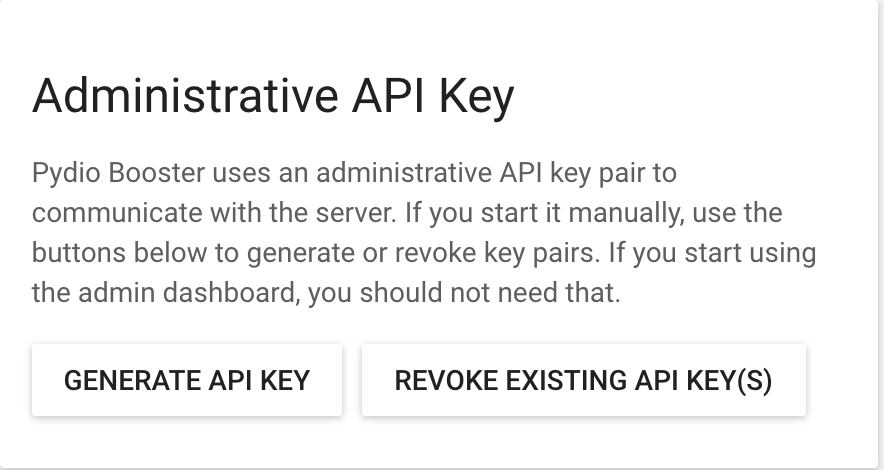
Now scroll down to Administrative API key and press Generate API Key. The resulting file should be available in data/plugins/core.mq/apikey(it will be found in this form TOKENP:TOKENS). You will need the information from this file to replace the TOKENP and TOKENS in the following sample configuration files.
Pydio Booster component was built on top of Caddy, leveraging NSQ, it implements websockets and an upload server. Here is a sample configuration files to make it work use them and change the values to the ones that you have, it's also useful for advanced configurations:
pydioconf.sample:
{
    "scheduler": {
        "host": "http:\/\/YOUR_HOSTNAME",
        "tokenP": "TOKENP",
        "tokenS": "TOKENS",
        "minutes": 2
    },
    "nsq": {
        "host": "0.0.0.0",
        "port": 4150
    },
    "caddyFilePath": ".\/pydiocaddy"
}
pydiocaddy.sample:
http://127.0.0.1:8090 {
    pydiows /ws     {
        pre {
            if {>Cookie} has "AjaXplorer"
            type request
            url http://YOUR_HOSTNAME:YOUR_OPTIONAL_PORT?get_action=keystore_generate_auth_token&device=websocket
            cookie AjaXplorer
            out token
        }
        pre {
            type request
            url http://YOUR_HOSTNAME:YOUR_OPTIONAL_PORT/api/pydio/ws_authenticate?key=TOKENP:TOKENS
            query auth_hash
            query auth_token
            out user
        }
    }
    header /io {
        Access-Control-Allow-Origin http://YOUR_HOSTNAME:YOUR_OPTIONAL_PORT
        Access-Control-Request-Headers *
        Access-Control-Allow-Methods POST
        Access-Control-Allow-Headers Range
        Access-Control-Allow-Credentials true
    }
    pydioupload /io     {
        pre {
            type node
            out node
        }
        pre {
            if {query} has "minisite_session"
            type request
            url http://YOUR_HOSTNAME:YOUR_OPTIONAL_PORT?get_action=keystore_generate_auth_token&device=upload
            query minisite_session
            cookie AjaXplorer_Shared
            out token
        }
        pre {
            if {query} not_has "minisite_session"
            if {>Cookie} has "AjaXplorer="
            type request
            url http://YOUR_HOSTNAME:YOUR_OPTIONAL_PORT?get_action=keystore_generate_auth_token&device=upload
            cookie AjaXplorer
            out token
        }
        pre {
            type request
            url http://YOUR_HOSTNAME:YOUR_OPTIONAL_PORT/api/{repo}/upload/put/{nodedir}?xhr_uploader=true
            header X-File-Direct-Upload request-options
            header X-Pydio-Admin-Auth TOKENP:TOKENS
            header X-File-Name {nodename}
            query *
            out options
        }
        post {
            type request
            url http://YOUR_HOSTNAME:YOUR_OPTIONAL_PORT/api/{repo}/upload/put/{nodedir}?xhr_uploader=true
            header X-File-Direct-Upload upload-finished
            header X-Pydio-Admin-Auth TOKENP:TOKENS
            header X-File-Name {nodename}
            query auth_hash
            query auth_token
            out body
        }
    }
    pydioadmin /admin
    basicauth /admin TOKENP TOKENS
}
To run Pydio Booster you simply need to run:
/path/to/pydiobooster -conf /path/to/pydioconf
For the path/to/pydiobooster, pydiobooster stands for the file that you downloaded above it should be named Pydio by default
Make sure to pass an absolute path to the conf.
However especially if you want to use the upload feature we recommend you to run it changing the process' owner:
sudo -u www-data /path/to/pydiobooster -conf /path/to/pydioconf
Troubleshooting
You can check the websocket status in your web browser's developer tools reloading the page with the console open (Chrome). If you dont see a switching back to polling message it means that it's working.
You should regularly check your logs.
For more advanced configurations and troubleshooting, make sure to read the dedicated articles in the Knowledge Base.
Back to top